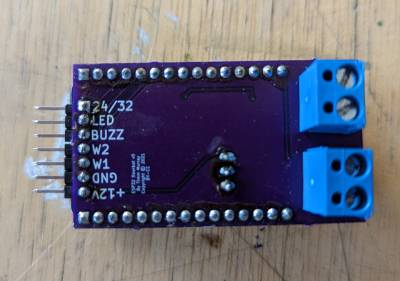
The doorbots come with a hat that should make connections relatively simple. It also makes it easy to swap them in and out in case of hardware failure.
Things You Need
- An esp32
- The hat for the esp32
- 3d printed case for the above
- A 7 pin (or 4 pin) female 2.54mm header (like these: https://www.amazon.com/Female-Headers-2-54mm-1x7Pins-Connector/dp/B0BFLGKJQ5) (Can take a long header and cut it to size with a wire cutter)
- 12V power supply (can also be 24V if the electric strike needs that and the RFID reader can take 24V)
- Power plug with a pigtail compatible with that power supply
- Soldering iron
- Glue gun
Wiring
The hat will have the pins laid out like this:
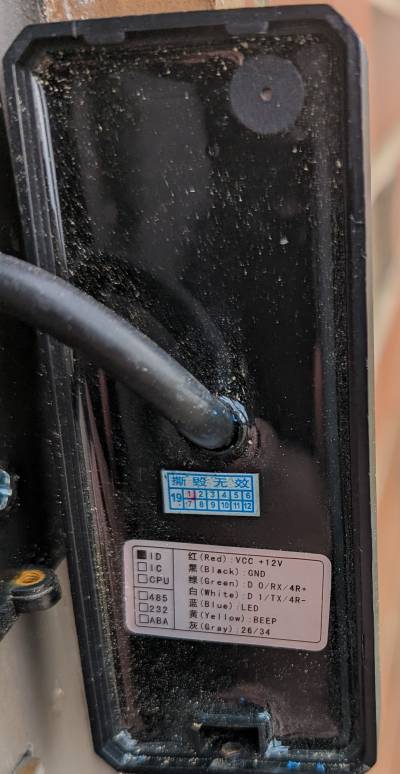
These will hook up to the reader wires from the outside. The color coding for the reader wires is on the backside of the reader:
Solder those wires to your 7 pin (or 4 pin) female header and plug it into the doorbot hat. The required connections are +12/Red, Gnd/Black, D0/W1/Green and D1/W2/White. Once its functionality is confirmed with a good scan, you can use the glue gun over the soldered wires to help with strain relief.
There are two screw terminals on the other side of the doorbot hat. One is for power, and the other goes to the electric strike in the door. Power is polarity sensitive. The electric strike is not polarity sensitive.
The power terminal can be connect to your pigtail to the power connector. Be sure to follow the correct positive/negative leads as labeled on the hat.
Then plug in your electric strike, reader connection, and power. It will take 10-30 seconds for it to boot up and connect to WiFi. Check that the electric strike is still in its locked position. Then make a valid scan, and the strike should open for about 30 seconds.
If RJ45 connectors/cable are used, the recommended pinout is:
- +12 = 8 = Brn
- Gnd = 7 = Brn/Wht
- D0=W1 = 6 = Grn
- D1=W2 = 3 = Grn/Wht
- Strike A = 4 & 5 = Blu & Blu/Wht
- Strike B = 1 & 2 = Org & Org/Wht

